Introduction
In this chapter of Tools & Techniques, Edge-to-edge percutaneous MitraClip® implantation is discussed using a stepwise approach. The following is a summarised overview of this technique. The complete, unabridged version with images is available online at www.eurointervention.org.
Mitral regurgitation (MR) is the second most frequent valve disease after aortic stenosis. MitraClip® therapy (Abbott Laboratories. Abbott Park, Il, USA) is a percutaneous edge-to-edge plication of the mitral valve (MV) leaflets mimicking the surgical Alfieri technique. MitraClip® implantation is a safe procedure, and survival outcomes in high-surgical-risk patients are superior to historical controls. A dedicated multidisciplinary team is necessary, as well as thoughtful patient selection, familiarity with the technical aspects of the procedure including transesophageal ultrasound imaging and post-procedure monitoring.
Indications
Patients with no surgical option or at high surgical risk and good/acceptable valve suitability might be considered. In degenerative MR, prolapse width <15 mm, height <10 mm, no significant leaflet sclerosis and mitral valve area (MVA) >4 cm2 are suitable for MitraClip® implantation. In functional MR, a degree of coaptation length, <2 mm gap between the leaflets and an angle (LA side) between both leaflets <120º are needed.
Step-by-step implantation
(Step 1) Begin by groin access through the right femoral vein (RFV) with a 9 Fr sheath and, after wiring towards the superior vein cava, withdraw the RFV and introduce the 18 Fr dilator. We recommend giving 2000-3000 IU of unfractionated heparin after the 18 Fr sheath is inserted.
(Step 2) Perform the transseptal puncture (Figure 1) in a posterior and superior position under guidance of real-time TOE.
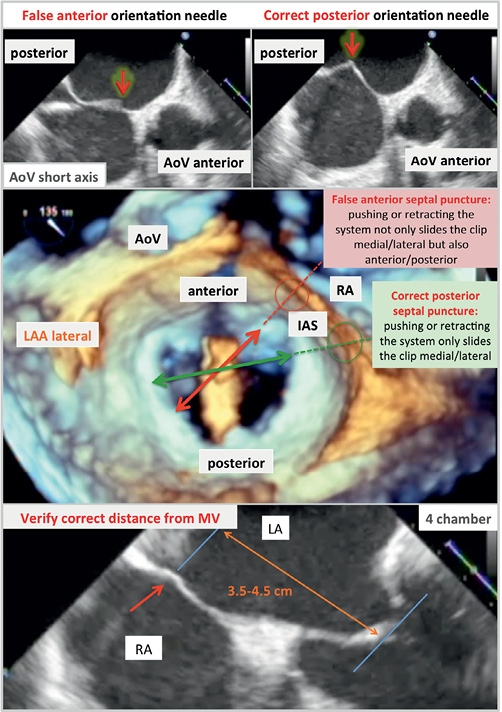
Figure 1. Clip delivery system and guiding catheter. The components of the delivery system and its functionality are illustrated. Right upper panel shows the different parts of the clip. Right inferior panel shows the composition of the handle of the clip delivery system.
(Step 3) At this point, introduce the steerable guide under TOE and fluoroscopy guidance.
Then, introduce the Clip Delivery System (CDS) after adequate preparation and continued saline flushing (Step 4).
(Step 5) In order to achieve proper positioning of the clip to the centre of the valve, it is important to combine the use of M-knob (M/L-knob) to achieve medial-lateral position, anterior/posterior positioning of steerable guide by anticlockwise/clockwise rotation and pushing/pulling the handle of CDS to lengthen or shorten the CDS (Figure 2 and Figure 3).
(Step 6) The intercommisural view on TOE provides information on the medial/lateral orientation of the CDS for a correct alignment.
(Step 7) Depending on the location of the MR, centrally or towards one side either medially or laterally, manoeuvre to position the clip over the mitral regurgitation origin splitting the MR jet.
(Step 8) Clip arm must be open in a 180º position when crossing the mitral valve manipulating the clip arm positioner (Figure 2 and Figure 3).
(Step 9) 3D-TOE views from the left atrium will assess the clip arm orientation perpendicular to the closure line of the mitral valve.
(Step 10) The clip arms must be maintained opened at 180 degrees while advancing across the MV into the LV under TOE and fluoroscopy guidance.
(Step 11) It is important to re-check the clip and shaft orientation on TOE on 2-chamber, LVOT and 3D views.
(Step 12) Next, to enable a symmetrical grasping of the leaflets, the shaft of the CDS should be in a position that equally divides the angle between the anterior and posterior MV leaflets (Figure 2 and Figure 3). The key to successful grasping depends on different factors: a correct optimal axial alignment in all TOE views, perpendicular alignment of the clip arms to the MV closure line and ensuring that both MV leaflets freely move above clip arms before grasping.
(Step 13) All echocardiographic views on TOE should be reviewed now to ensure proper leaflet insertion.
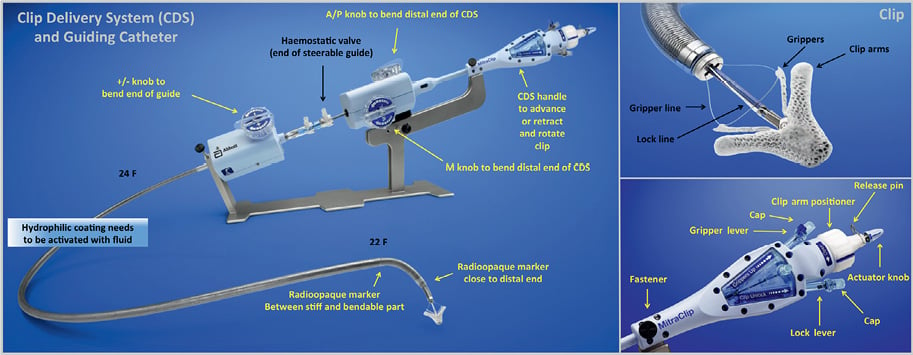
Figure 2. The use of transesophageal echocardiography (TOE) for guidance during transseptal puncture. Posterior transseptal puncture is mandatory for the correct deliverability of the clip. The central image correspond to a 3D-TOE from the left atrium with a MitraClip® towards the MV opening, illustrating the position of the transseptal puncture for a correct alignment of the clip.
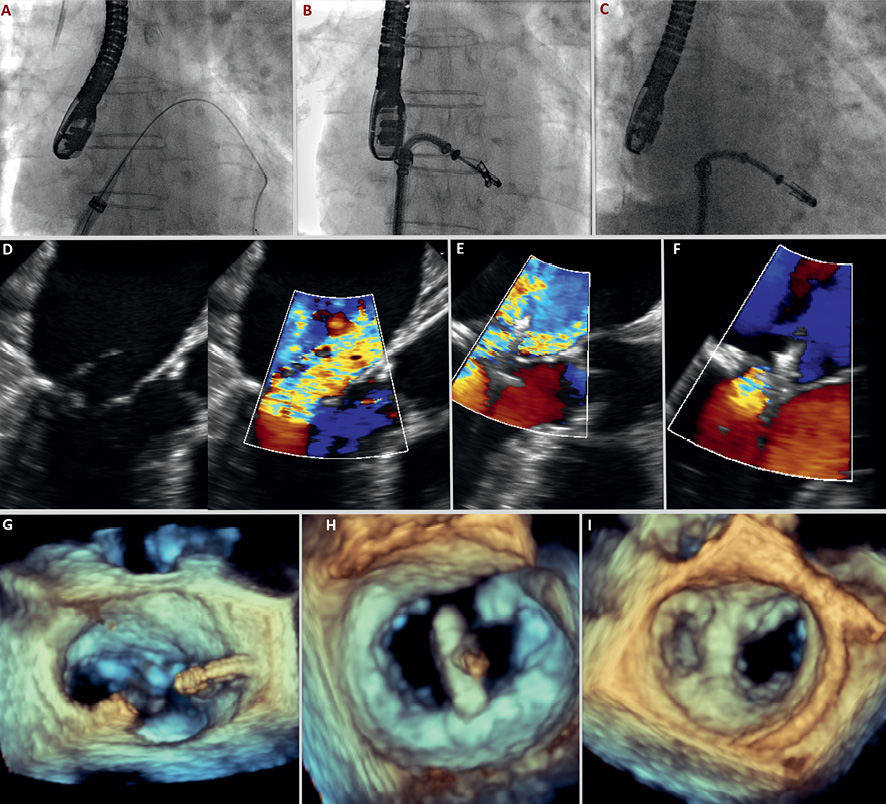
Figure 3. A step-by-step method for MitraClip® implantation in a 82-year-old male with severe organic MR. A) The MitraClip® dilator is advanced through the fosa ovalis puncture, following the wire inserted in the left pulmonary vein. B) After entering in the left ventricle crossing the MV under TOE guidance, the clip is opened and oriented perpendicular to the MV orifice. C) The clip is closed completely, grasping both anterior and posterior leaflets, before final release. D) A LVOT view, TOE image showing a severe MR caused by P2 prolapse. E) Positioning the clip under TOE guidance, centered in the area of maximal regurgitation. F) A TOE demonstration of reduction of MR to grade 1 after complete grasping of anterior and posterior leaflets. G) 3D-TOE image illustrating the MitraClip® catheter advanced through the interatrial septum. H) 3D-TOE image from a surgical view –this is from the left atrium– showing a correct positioning of the clip 90º from the longitudinal axis of the MV. I) A two-orifice view after edge-to-edge plication with the Mitraclip®, from the left atrium into the LV.
(Step 14) After the clip has been closed and the position is optimal, the degree of MR reduction should be assessed with colour Doppler in all TOE views. Sometimes, when the position of the clip and resultant MR reduction is suboptimal, the clip can be opened and repositioned.
(Step 15) If the position is optimal, the clip can be deployed turning the actuator knob eight times 360 degrees in an anticlockwise direction.
(Step 16) After the CDS has completely separated from the clip, the CDS handle can be removed.
(Step 17) In case a second clip is needed, the CDS should be removed while keeping the steerable guide in place.
(Step 18) Groin closure with suture as well as haemostasis with manual compression/compression devices are of pivotal importance and bleeding is a major risk factor for morbidity.
Difficulties
Technical issues may arise when: the pathology is non-central, there is a MVA <4 cm2, multiple regurgitation jets are present, the anatomy is unfavourable for septal puncture and clip steering (e.g., septal aneurysm), the patient is unstable or left ventricular ejection fraction is very poor (<15%).
Complications
Despite the fact that MitraClip® implantation is a safe procedure; there are potential complications that operators must be aware of. We summarise the most frequent and its treatment.
Partial clip detachment: clinical and echocardiographic follow-up. If the patient is highly symptomatic, consider a second procedure for a new MitraClip® implantation.
Pericardial effusion/tamponade: during transseptal puncture, be prepared with pericardial drainage on site.
Hanging the chords: be aware of this potential complication that may worsen MR.
Thrombus formation: ACT every 30 min (between 250-300 sec).
Arrhythmias: both atrial and ventricular, prepare the defibrillator.
Acute pulmonary oedema: conventional treatment (oxygen, vasodilators and diuretics.
Conclusions
MitraClip® implantation is a technically demanding procedure that requires meticulous care following all the recommended steps. The safety profile of this device appears to be excellent despite the high-risk profile of the patients treated.
Conflict of interest statement
The authors have no conflict of interest to declare.